Introduction: Two Aiming Styles
What is the difference between these two players aim?
Even though the one on the left is snappy and, pretty flashy it’s not hard to see their weaknesses. They’re shaky on their microcorrections and lack smoothness, their motions are very jagged. On the other hand, the one on the right is much calmer, they look in control of their crosshair, and their motions much more seamless.
The thing is both of these players are me. The left is from three years ago, the right today and I’m a much better player for having made this change. But how did I go from a snappy style to a smooth one and how did I do it without losing my flicking speed?
The Problem with “Just Relax”
If you looked up how to improve your smoothness online you’d probably find something about staying calm and keeping your muscles perfectly relaxed. This Is how most people go about getting smooth aim and it can work for some situations but this method of aiming smoothly has one massive weakness. Your muscles are the things that make your aim fast, relying on keeping them relaxed at all times for smoothness will massively limit your speed, or your smoothness at higher speeds. I know this because I tried it, when I decided I wanted to make my aim smoother I took this approach but never got better at situations where I had to move quickly, the shakiness would come right back. So how can tension both be bad for smoothness and necessary for good aim?
Understanding Grip Tension
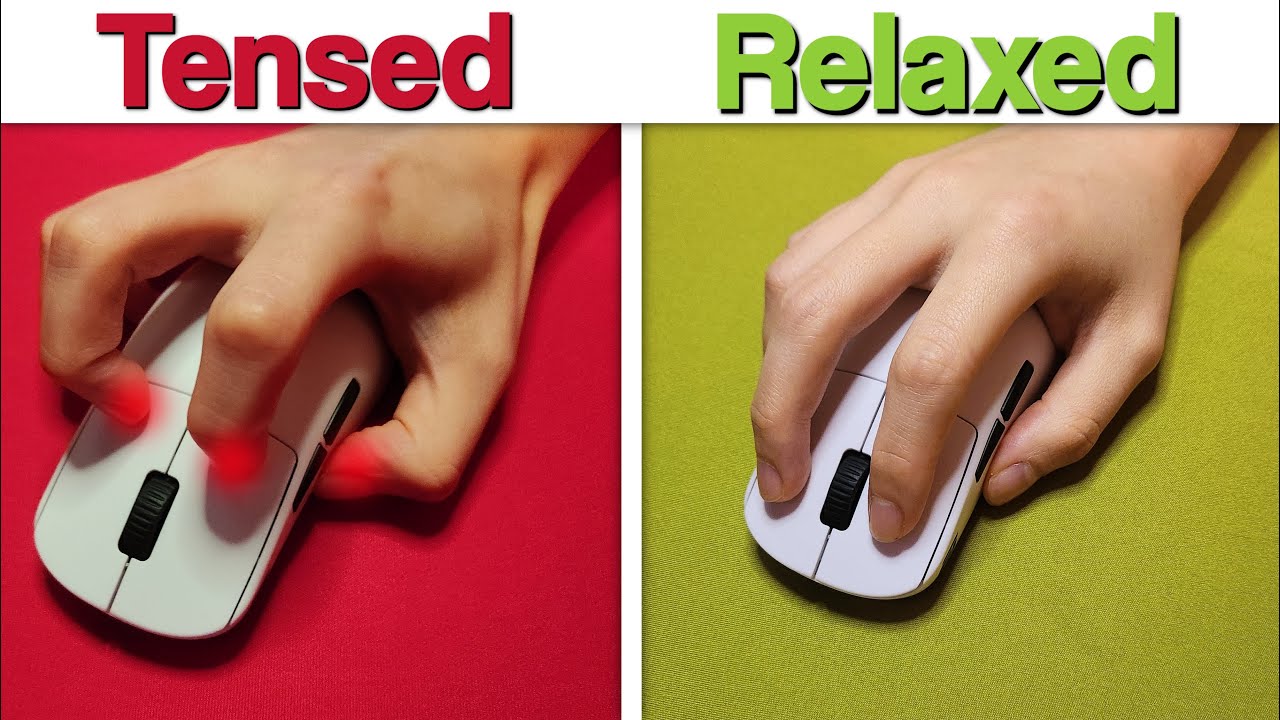
First, lets have a look at why people think you should keep your aim relaxed to begin with. Try placing your hand gently on the mouse and moving it side to side,, and now try again while pressing down firmly on all the buttons. Doing this requires increasing the tension in our fingertips and it’s pretty clear that movements are a bit more “stepped” when applying that downwards force, which, when done in excess can absolutely contribute to a lack of smoothness and lead to massive disconnects between motions. So, why don’t we just… not tense our hands when aiming? I think that comes down to the reason people start in the first place, it creates this feeling of control, when aiming at smaller targets or in high stress situations it’s natural to apply more pressure and from there it’s an easy habit to get into. That “feeling” of control is, fake though. Increasing tension in those situations makes it harder to make any movement, intentional or unintentional, so while you might become a bit more stable it will make adjusting to movements next to impossible. Between the mechanical issues it causes and the risk to your hand’s health it presents, excessive fingertip tension is absolutely a habit you should try to break.
Beyond Grip Tension
So it’s clear where tension got it’s reputation from, people were applying too much when holding the mouse, stopped and noticed their smoothness improved, then concluded that all tension was bad. But, what if I told you that grip tension wasn’t the only type of it? And that correctly utilising the other types is the actual way to not only get better at reducing grip tension but also for getting smoother aim? But to achieve this, we need to understand how tension affects different parts of our aim, both positive and negative and figure out how we can avoid those problems that are so commonly associated with it.
The Tension Budget and Lockout
Let’s go back to the clip from the start of the video again. That sudden burst of speed is achieved using tension, but instead of being located in the mouse grip this tension is in the muscles of my wrist and arm. I have to place some stress in those muscles to get to that fast flicking speed. But then, how do I stop that movement? My approach at the time was to apply even more tension at the end of the flick.
Understanding Lockout
I like to think of tension as a scale from 1 to 10, the start of a movement like this might be a 5 and the end might be an 8? And this looks like it works, my crosshair does stop, but look at what happens after. I can’t make the smooth microadjustment I need to to reach the target. This is because we only have a limited amount of tension to go around. You can test this for ^yourself, tense your arm as much as you possibly can, to the point of it almost vibrating? for 5 to 10 seconds, and then try to make very small movements with your arm straight away. It takes a while for it to recover from that exertion, the first movements will be shaky and jagged and only start to smooth out over time. This is called lockout and is what happens when you try to use more tension than you have available and is why it’s so important to budget your tension well. In the case of the clip from earlier, I add extra tension to stop, but have to wait to release that tension before I can microadjust smoothly. I know we are talking fractions of a second here but in a gunfight this difference is significant: Tensed,, not tensed,, tensed, not tensed.
Short-Term vs Long-Term Lockout
This is just in the short term though, a tiny delay after an extreme burst of tension. But that isn’t the only time this can happen. Both high amounts of tension very quickly and moderate amounts of tension over a long time can cause the exact same effect. An example of this might be a teamfight in apex, if your tension starts high and stays high, eventually you’ll experience that same feeling. Your muscles will lock up and they just wont move right.
So again, it seems like tension is a bad thing here, it’s causing either a delay after any flickshot or shaky microadjustments. But that is only if you don’t know how to control it.
Managing Your Tension Budget
I found it helpful to think of high tension like.. sprinting, it does offer a very powerful burst of speed but comes at the cost of a lot of energy, we have to rest and recover after doing it. You’ll tire yourself out too fast otherwise. But if you were to jog instead, or sprint for a little before going to a jog to let yourself recover, you’ll be able to sustain a higher average speed for longer. This is the core idea behind managing tension over any period of time. Controlling when you utilize it and when you relax to get the most out of the tension you do have, your tension budget.
Releasing Tension Mid-Flick
The second method of stopping the momentum of a flick is that idea compressed into the space of a single mouse movement: you release the tension from the start of the flick before you reach the target, let the momentum you generated carry you the rest of the way. This is tension budgeting in the short term, going from a sprint to a jog. After implementing this technique I was able to make those snappy movements while still being able to adjust fluidly afterwards, I wasn’t stuck in that recovery period. This is how good tension management leads to good smoothness. Having smooth aim isn’t just about moving at one speed consistently, it’s about being able to dynamically go between different speeds as required, smoothly blending fast flickshots into controlled microadjustments with no delay or shakiness in between, which is impossible without using tension. Through controlling that tension we can combine the benefits of a smooth style, the seamless movements and lack of shakiness, with the speed of a snappier style.
Large Angle Flicks
But what about for even faster movements? Large angle flickshots like these, does this same idea of releasing tension mid flick still apply there? Yes! And if anything, it gets more important the larger the flick is. The more you have to move your mouse and the faster you move your mouse the more tension you use and inertia you create, which all still has to be counteracted to stop that movement. So stopping using tension requires more of it, the downsides get worse, but stopping by releasing tension gets easier since the window you have to release it in gets larger. On top of that though, there is another technique we can implement here to make our movements flow together even better. But to explain that I first need to talk about muscle groups.
Muscle Groups and Independent Tension Budgets
There are two muscle groups that most people use to move the mouse, the wrist and the arm. Because of it’s smaller range of motion, the wrist is more suited to smaller movements, like the one showed earlier. The arm on the other hand has a higher maximum speed and wider range of motion, so we want to primarily use it for larger movements. Since tension is just us activating our muscles, that means we can tense in each muscle group individually. So for flicks, we can tense our arm without tensing our wrist. What this means is that even if we can’t release all of that tension we needed to start the flick in our arm in time, we can still make follow up movements with our wrist since it already had very low tension. Each muscle group has independent tension budgets, so we can dynamically change how much tension we are applying to each one to let the other recover. This applies across every type of aiming as well, for example start a track by adjusting with your wrist and slowly transition into following through with your arm.
The Third Muscle Group: Fingertips
The arm and wrist aren’t the only two muscle groups we can use though. Remember grip tension? The thing that was never good and was the cause of unsmooth aim? Coming back to it after learning all of this about dynamic tension management gave me an idea: What if fingertip tension is similar, useful when controlled properly? And, it is! Utilising my fingertips when aiming was honestly a pretty massive breakthrough for me, even though at the time I didn’t move the mouse with my fingertips at all.
Benefit 1: Stability
The first benefit this has is stability. Since placing more tension in your fingertips will make movements more rigid and snappy, even if those movements are made with a different muscle group, varying the amount of fingertip tension your using opens up a way to get similar benefits to what wrist tension offers without actually tensing your wrist. So when tracking a target, if you have to correct for a change in direction you might place some tension in your fingertips to make that correction snappier, which will work even if you don’t move the mouse with your fingertips. Dynamically controlling the amount of tension I placed in my fingertips, adding or removing it as needed, was what finally got rid of my issues with gripping my mouse too tightly. Gaining control over it fixed that weakness.
Benefit 2: Precision
The second and much more impactful element is actually using them to make movements. Even when holding my mouse in a claw grip they have a surprisingly large range of motion, and since they are the most precise muscle group we have, the accuracy within that range of motion was a lot better than my wrist could offer. Plus having a third tension budget to offset tension to helped a lot with my overall tension management over longer periods.
Applying Tension Management in Games
Okay, I know this is a lot of information and it can be pretty hard to grasp what this stuff actually does when looking at it in a purely theoretical context, so how does tension budgeting on a longer timeframe apply in games?
Example 1: Snapping Between Angles
A big one for me was trying to flick as quickly as possible between angles. My thought process was that it would reduce the potential down time where I could get swung and taken by surprise, and kept me feeling locked in and those things are true, but I didn’t realize how much tension those movements used. Snapping between angles caused both a delay between the flick and any movements after in the short term and a long term tension budgeting issue. My tension would gradually increase as I kept flicking between points and by the time I actually got into a gunfight I had none left to utilize, both because of the high tension itself and because I was exclusively using my wrist. Now, through both implementing releasing my tension mid flick and integrating more muscle groups into my aim, I’m never even close to entering lockout when starting gunfights. Any snaps between angles that do happen are lead with my arm, leaving my wrist and fingertips free to microadjust if I need to.
Example 2: Tracking-Focused Games
A similar thing can happen in tracking focused fps games as well, after a gunfight that requires a lot of tension it’s easy to unintentionally hold onto it, especially when nerves are factored in. Which can result in the same issue, entering the next gunfight almost at the point of lockout. This is why it’s good to get into the habit of relaxing your muscles, releasing that tension and refilling your tension budget in preparation for the next engagement. This is probably part of why the advice to take deep breaths, relax and stay calm in games is so effective, it helps encourage good tension management by getting you to relax your muscles.
Example 3: Flick-to-Track Transitions
Another thing to be mindful of in games that require tracking is the tension flicks use generally. Even with good tension management, if you are flicking really fast that recovery period afterwards can cause a disconnect between a flick and track. Sometimes it can be faster in terms of time to kill to flick a bit slower here, especially in games like apex or overwatch, just to ensure that you have a smooth transition between the two movements.
How to Train Tension Management
Now, this information is great and all but keep in mind, when talking about flicking technique, this is how quickly that is all happening. It is impossible to be aware of this in real time, and I doubt most players who are very good at flicking have even considered it. The value of this knowledge comes from how it informs the habits you strive to develop. Unless you are doing something very wrong like overtensing like crazy for every movement or only using your wrist for everything, knowing and understanding this won’t change your aim overnight. What it will do is set you up to develop better aiming technique and allow you to work towards a better balance of speed and smoothness.
Part 1: Awareness of Tension Levels
There are two parts to this: the first is being aware of what different levels of tension feel like, the second is being able to control it on both short and long timescales. I worked on both of these by playing mostly tracking scenarios in aimtrainers. Tension plays a similar role there to what it does in flicking, it is a temporary speed booster. When a target changes directions we want to use some tension in our wrist or fingertips to catch up to it, before releasing that tension once we do to let our tension budget refill before the next strafe. Even with that we have to use tension sparingly though, these scenarios often go for a minute or longer so even if you release that tension after an adjustment, using too much on those adjustments will build up over time and lead to lockout. Scenarios like air voltaic or whisphere were fantastic for making me more aware of what different levels of tension felt like and how much I actually needed for each movement.
Part 2: Identifying Bad Habits Through Reflection
Tension issues over a longer timeframe had much more mental than physical causes for me. Things like bad habits I’d built up or issues I wasn’t conscious of. Some examples that I’ve talked about here are death gripping your mouse, snapping very quickly to angles or not releasing tension after fights, but there are a lot more and I don’t have time to go through them all in this video. In my experience, the best way to identify these was reflection. A lot of the time these issues lead to dying in game which is actually kind of a positive here. It gives you time to think about if you were too tense or not, figure out why it came about and make note to release that tension in the future.
The Importance of Using Multiple Muscle Groups
The one exception to this mental rule was muscle group utilisation. I used to play with only my arm, then swapped to only my wrist when I started using a higher sensitivity. And no matter what I tried, I could not have good tension management when only using a single muscle group. There simply was nowhere to offset tension to and a lot of the time you won’t have a chance to just stop moving mid fight and release that tension without offsetting it to a different body part. It’s like trying to run a relay race solo, you’re probably going to lose. I recommend trying to use at least two muscle groups but honestly, I found that I got a lot better at skills I was really weak at after actively training all three.
Part 3: Practicing Tension Release
Now for the hard part, actually being able to release tension mid flick or track. How I went about this personally was with aimtrainers, I played scenarios like waldots or beants for flicks as well as the aforementioned tracking scenarios and actively thought about how much tension I was using or when I was releasing it. I don’t think aimtrainers are absolutely needed for this though. I know that thinking about your aim when your playing is generally considered a bad thing and I agree! I try to keep my mind on the match when I’m in one, but when practicing, whether that’s in deathmatches or aimtrainers, I’ve found that actively thinking about my mechanics, experimenting with different variables and figuring out what works best and focusing on making that a habit to be incredibly valuable.
So, in those deathmatches, I might try experimenting with how early within the flick I can release my tension before I start to underflick, or on those kovaaks scenarios I’ll see how much tension I can use when starting a flick before it has any negative impacts.
Final Thoughts: Experiment with Your Mechanics
This process of experimenting with different ideas, seeing how they change my own mechanics and reflecting on that to see what works and what doesn’t has been invaluable to both my understanding of tension within aiming and honestly, aiming as a whole and if you take one thing away from this video it should be that: Don’t be afraid to experiment with your mechanics. It forces you to actively think about your aim and what you can do to improve it which, at the end of the day, is what practice is all about.
Thanks for watching, believe it or not I have a LOT more to say on the topic but this video ended up being way, way longer than I expected it to be so I’ve put some of those other ideas in a patreon exclusive video! In it I go over how I personally use tension in each of the voltaic aimtraining categories, like what different muscle groups do in each one, how different techniques like leading shots interact with tension, that kinda stuff. Nerdy detailed information that’s too in depth for a video like this one, so that’s there if you’re interested.